Last night (this morning?), in a fit of insomnia, I was pinning like a fiend.
Somewhere out in blog land, an intrepid crafter had made round, ornament-shaped treat holders out of parchment paper. Unfortunately, upon waking this morning, the pin was nowhere to be found. Nonetheless, that set a light-bulb off in my addled, sleep-craving brain. Why not make a standing treat bag? And add a name to the ribbon to make place cards?
Supplies:
- Treat Bag Template (or make one yourself!) Yes, I realize it is upside down. After you print it, turn it right side up. And all will be well with the world.
- Paper
- Parchment paper
- Kitchen scissors
- Decorative paper
- Sewing machine
- 13 inches of ribbon (for each bag)
- Wooden spoon
- CANDY!!!
Using the fold of the paper, draw the shape you'd like. Add a line about half an inch above the fold. This will be the fold line on both the back and front. Click here for my template.
Cut out the shape. Fold on fold lines.
Get out the parchment paper and a clean scissors. Cut off a chunk--wide enough to fit your template.
Fold parchment paper in half.
Place folded template over folded parchment paper. Match up the bottom folds. Clip template to parchment paper. Cut parchment paper. Make
sure to make the neck of the bag long enough. Do not cut across the top
of the template, just cut to the top of the parchment paper - you will
need extra paper on top.
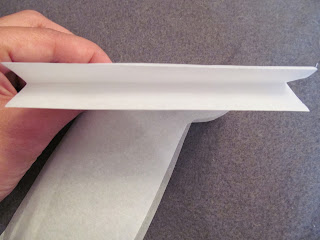
Remember that fold line you drew (dotted line on template)? Fold both sides of the parchment paper in approximately the same place.
The fold should be inward at the bottom.
After it's been folded, it should look like this:
Cut a piece of decorative paper to fit across the middle of the parchment paper. I only did this on one side.
Stoke up the sewing machine. Use somewhere between 1/4 and 1/2 inch seam allowance. Sew both sides. Back stitch bottom fold and at top paper opening. Do not sew across bottom fold.
Stoke up the sewing machine. Use somewhere between 1/4 and 1/2 inch seam allowance. Sew both sides. Back stitch bottom fold and at top paper opening. Do not sew across bottom fold.
Use the handle of a wooden spoon to push out the fold at the bottom of the bag.
This is what makes the bag stand up on its own. See how the bottom of the bag flattens out? Add desired amount of candy and/or nuts.
Cut out a piece of nice paper. Card stock works well. Write the recipient's name and punch a hole to the right of the name. Get a piece of ribbon. From underneath the paper, draw the ribbon through the hole. Tie a bow.
Standing treat bag or party favor! That doubles as a place card!


No comments